
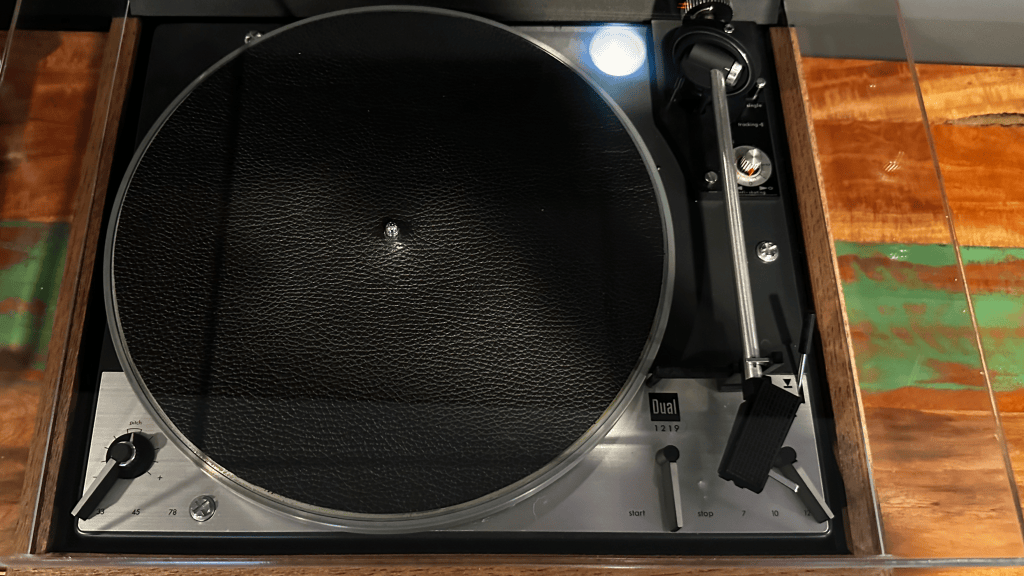
My Dual 1219 Journey: Finding, Restoring, and Upgrading a Vintage Classic
Finding the right one was only the beginning. Bringing it back was the real journey.
Why I Wanted a Dual 1219
The biggest reason I started looking for a Dual 1219 was actually pretty simple: I wanted an automatic turntable.
Every turntable I had owned up to this point had been fundamentally manual. Some offered a little assistance, such as a cueing mechanism to raise and lower the tonearm, but playing a record was still a hands-on process. Move the arm into position, lower the stylus, and when the record ends, get up and take care of it yourself. I enjoy that ritual, but I wanted something different for my next turntable.
I wanted to experience a machine where the mechanics were part of the attraction, press a lever and watch the turntable take over. The tonearm moves into position, lowers onto the record, and returns when the side is finished. And with the Dual 1219, that automatic operation is only the beginning. Its ability to function as a record changer made it even more interesting to me.
But I didn’t want just any automatic turntable.
I also wanted something with real recognition behind its name. The Dual 1219 isn’t an obscure model that requires an explanation every time it comes up. It is one of those vintage turntables that has remained recognizable decades after it was produced. For a turntable from the early 1970s to still inspire restoration projects, discussions, replacement parts, and an active following more than half a century later says something about the machine Dual built.
Then there was the mechanical side of it.
Part of what makes vintage audio interesting to me is understanding how these machines accomplish what they do. The 1219 is almost the opposite of a minimalist turntable. Underneath the platter is an elaborate mechanical system responsible for controlling the tonearm, automatic start and return, speed selection, and record-changing functions. There is a lot happening every time you move one of those controls, and I wanted a turntable where learning how it worked would be part of the ownership experience.
Finally, aesthetics mattered.
I wanted something that looked unmistakably vintage without feeling dated in the wrong way. The combination of the large platter, compact control layout, substantial wooden plinth, and all of those wonderfully mechanical levers gives the Dual 1219 exactly that character. It looks like a serious piece of 1970s engineering because that’s exactly what it is.
So my search really came down to four things: automatic operation, name recognition, mechanical complexity, and aesthetics.
On paper, the Dual 1219 checked every box.
The next challenge was finding the right one.
Affiliate Disclosure: Needle & Vine is supported in part through affiliate partnerships. If you purchase a product or vintage component through links in this article, I may earn a small commission at no additional cost to you. These partnerships help support independent reviews, restorations, and new content.
The Search for the Right Dual 1219
Finding a Dual 1219 isn’t particularly difficult. Finding the right Dual 1219 is another story.
I searched for the better part of 18 months, watching listings come and go and getting a pretty good sense of what was available. There always seemed to be plenty of them online, but they were in every imaginable state of condition. Some had clearly lived hard lives. Others looked beautiful but came with vague descriptions about what did and didn’t work. And whenever an especially nice example appeared at a reasonable price, it seemed to disappear before I had a chance to seriously consider it.
The really pristine examples presented a different problem: price. Fully serviced or restored 1219s can command enough money that I repeatedly found myself questioning whether I wanted one that badly.
So I waited.
What I Was Looking For
After watching the market for a while, I had a fairly clear idea of what I wanted.
I wasn’t necessarily looking for a museum piece, but I wanted a 1219 in very good physical condition and as close to original as reasonably possible. The plinth mattered. The dust cover mattered. The controls and cosmetics mattered. I wanted the accessories that originally made the 1219 special, and most importantly, I wanted its mechanical functions to work as they were intended.
That last requirement was particularly important.
If I were buying the Dual simply to operate it manually, there were plenty of other turntables I could have chosen. Automatic operation was one of the primary reasons I wanted a 1219 in the first place. Auto-start, tonearm movement, auto-return and eventually the record-changing functionality weren’t novelties I was willing to write off. They were part of the reason for owning this particular turntable.
Buying one online made that requirement considerably more complicated.
With a turntable that’s more than 50 years old and one containing this many mechanical systems you have to put a tremendous amount of trust in the seller. A listing saying that a turntable “works” doesn’t necessarily mean every function works. It may simply mean the platter spins and music comes out of it. Add the prospect of shipping a heavy vintage turntable with a suspended chassis, platter, tonearm and dust cover, and I never felt completely comfortable taking a chance on the wrong example.
Finding One Locally
Eventually, after nearly a year and a half of looking, a Dual 1219 appeared locally.
On paper, it was exactly the kind of opportunity I had been waiting for. The price was reasonable, the turntable was in excellent physical condition, and I could actually see and operate it before handing over any money. After spending so much time looking at photographs and descriptions online, simply being able to stand in front of a 1219 and inspect it myself was a major advantage.
And initially, things looked very promising.
Operating the turntable manually, everything seemed fine. The platter ran, the tonearm behaved properly, and most importantly, it sounded excellent. Physically, this was one of the better examples I had encountered during my search.
Then we tried the automatic functions.
Nothing.
That was a pretty significant disappointment. After 18 months of searching specifically for an automatic turntable, I had finally found the Dual 1219 I wanted and the very functions that had drawn me to it weren’t working.
Under different circumstances, that probably would have ended the purchase right there.
But buying locally gave me an option I wouldn’t have had with most online listings. The shop acknowledged the problem and offered to repair the automatic functions before I bought it.
Suddenly, the turntable I had been searching for was still very much in play.
And, as I would eventually discover, getting those automatic functions working would only be the beginning of my experience with this particular Dual 1219.
First Look: What Did I Actually Buy?
Remember that local Dual 1219 the shop offered to repair for me?
I never got it.
After waiting for an update that never came, I eventually reached back out to the shop. They had sold it to someone else who was willing to take it as-is, without waiting for the automatic functions to be repaired.
After searching for nearly 18 months, finally finding a 1219 locally, seeing it in person, listening to it, and thinking I had found the one, that was disappointing.
So it was back to the internet.
Back to eBay
As luck would have it, not long afterward another promising Dual 1219 appeared on eBay.
This one wasn’t cosmetically perfect. Someone had put stickers on the top plate, and the wooden plinth had clearly seen better days. But those were things I could deal with. What mattered more was that the seller described the turntable as mechanically functional, and at $375 plus shipping, the price seemed reasonable enough to take a serious look.
After my experience with the local 1219, however, I wasn’t going to rely solely on a written description.
Before buying it, I asked the seller for videos demonstrating the turntable’s various functions. I wanted to actually see the mechanics operating, the automatic functions in particular before committing to another 1219.
The videos came back, everything appeared to operate as expected, and I felt comfortable enough to finally pull the trigger.
A few days later, a fairly nondescript box appeared at my front door.
I was excited. That excitement didn’t last very long.
Opening the Box
The seller had shipped plenty of vintage audio equipment before and had thousands of positive reviews on eBay. Based on that history, I had little reason to expect a problem. But it quickly became clear that shipping vintage audio equipment and properly shipping a vintage turntable are two very different things.
The Dual 1219 is heavy. Very heavy. And all of that weight matters when a turntable is bouncing around inside a box for hundreds of miles.
Several critical precautions had been overlooked. The platter had been left installed. The counterweight was still attached. The removable cartridge carrier had not been taken out and secured separately. The tonearm had not been adequately immobilized. And critically, the transit screws had not been secured.
In other words, the heavy turntable chassis was free to move within the plinth while the package made its way to me.
The first casualty I noticed was the dust cover.
It had cracked around the base. It wasn’t completely destroyed, it remained in one piece and technically could still be used, but cosmetically, it was badly damaged.
Then I removed the cover. The tonearm was swinging freely. The cartridge carrier had separated from the tonearm.
At this point, things were starting to look pretty bleak, but I still had some hope. A damaged dust cover could be replaced. The cartridge carrier could be inspected. Maybe the important parts of the turntable had survived.
Then I tried to lift the turntable out of the box.
That’s when I realized how bad things really were.
The Plinth Had Essentially Destroyed Itself
The wooden plinth had broken apart in three places, primarily around the corners.
My best guess is that the sheer weight of the 1219, combined with insufficient packing and the unsecured transit screws, simply overwhelmed the aging plinth. Instead of the chassis being locked down for transportation, that substantial mass was allowed to move against a wooden enclosure that was already more than half a century old.
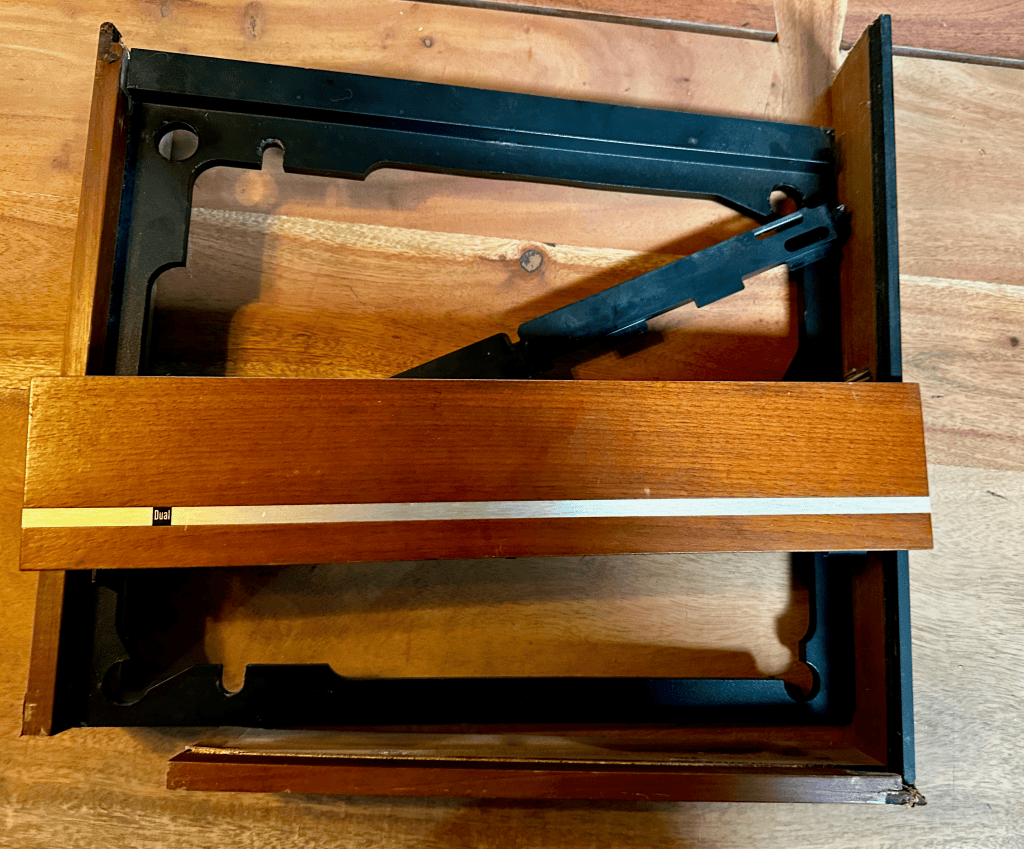
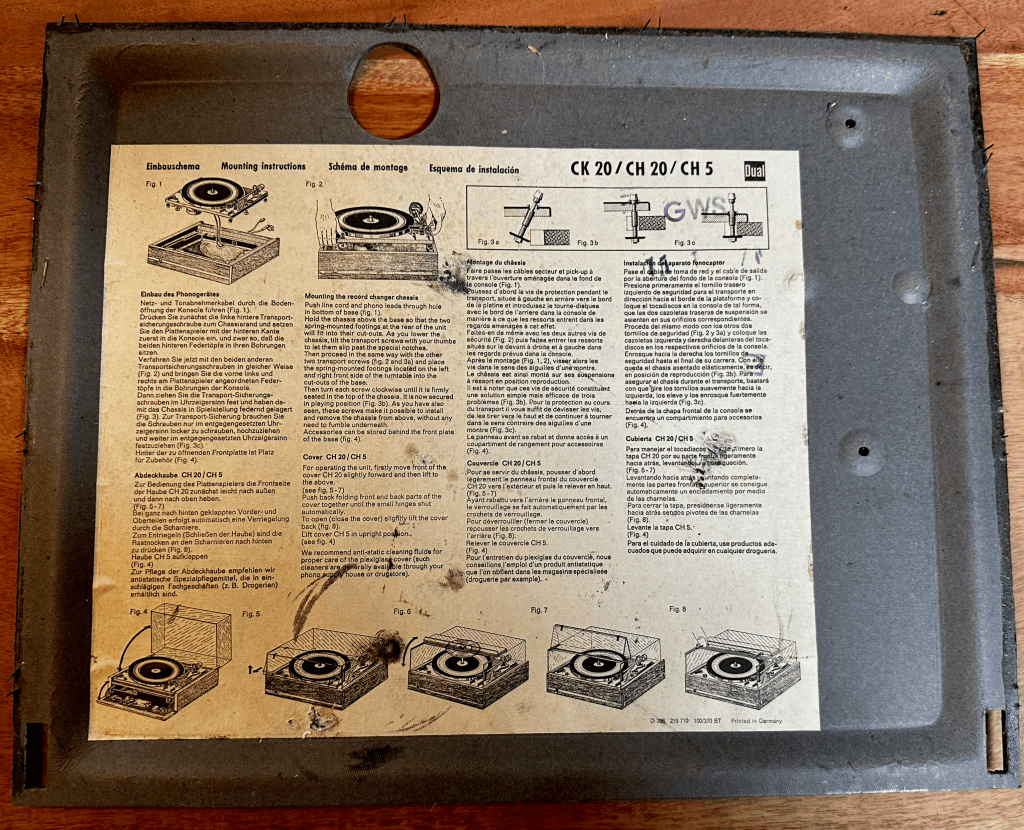
The plinth never stood much of a chance.
And there was another problem.
Because the heavy platter had also been left installed, the forces created during shipping had apparently shaken several important pieces loose from the turntable itself. Parts that had been securely in place when the seller recorded those videos had literally vibrated their way out during transit. At this point I had gone from buying a functioning Dual 1219 with some cosmetic imperfections to unpacking what looked like the beginning of a restoration project.
Not exactly what I had planned.
But underneath the shipping damage was still the turntable I had spent a year and a half trying to find. And importantly, the core of the Dual had survived.
I’m not throwing the original plinth away. For now, it will go into storage with the other parts from the restoration. The damage is significant, but enough of the original cabinet remains that I believe it may still be worth saving. If I eventually find someone with the woodworking and veneer skills to repair it properly, I may have it restored, either to return this Dual 1219 to something closer to its original configuration or to give the plinth a second life with another table. There’s no reason to make that decision today, and once an original piece like this is discarded, there’s no getting it back.
A Warning About Shipping Vintage Turntables
If there is one lesson from this experience for anyone considering buying a vintage turntable online, it is this: do not assume that a seller who knows how to ship audio equipment knows how to ship a turntable.
Turntables require special preparation before shipping, and vintage models can be particularly unforgiving. A 50-year-old plinth, suspension system, tonearm assembly, dust cover, and other mechanical components were never designed to absorb the abuse of modern package transportation while fully assembled.
At minimum, I would want a seller to:
- Remove and separately secure the platter.
- Remove the headshell or cartridge carrier when possible.
- Remove and secure the counterweight.
- Remove and separately protect the dust cover.
- Properly secure the turntable’s transit screws.
- Immobilize the tonearm.
- Protect the chassis so it cannot move inside the plinth.
- Use substantial padding around every component.
- Double-box the turntable or, when appropriate, ship major components separately.
If you’re buying from someone who has never shipped a turntable before, have that conversation before you purchase it. Ask how they intend to prepare it. If necessary, provide instructions.
A seller’s feedback score can tell you a lot about whether they’re trustworthy. It doesn’t necessarily tell you whether they know how to package a 50-year-old turntable.
I learned that lesson the hard way.
Fortunately, this isn’t the story of a Dual 1219 that was destroyed in shipping.
It’s the story of one that arrived needing far more work than expected and how I decided to bring it back.
I actually waited a few days before contacting the seller. By then, I had spent enough time going through the 1219 to convince myself that the important parts had survived and that I could repair what had been damaged. I had already planned to replace the tired plinth and eventually install a new dust cover anyway, so as bad as that first look had been, the situation wasn’t quite as hopeless as it initially appeared. When I finally contacted the seller, he acknowledged that the turntable had not been properly packaged and refunded me $175 of the original purchase price. That effectively brought my cost for the 1219 itself down to $200. Suddenly, I had a mechanically promising Dual, a restoration I felt capable of taking on, and considerably more room in the budget for the upgrades I had wanted from the beginning. Maybe things were finally starting to look up.
Restoring the Dual 1219’s Missing Functions
With the remains of the plinth out of the way, I could finally concentrate on what really mattered: figuring out whether the Dual 1219 itself had survived the trip.
At this point, cosmetics weren’t important. I didn’t have a usable plinth. The dust cover was damaged. Parts had literally fallen out of the turntable during shipping. What I did have was the core of a Dual 1219 sitting in front of me and a growing determination to figure out how all of it went back together.
That turned out to be an education.
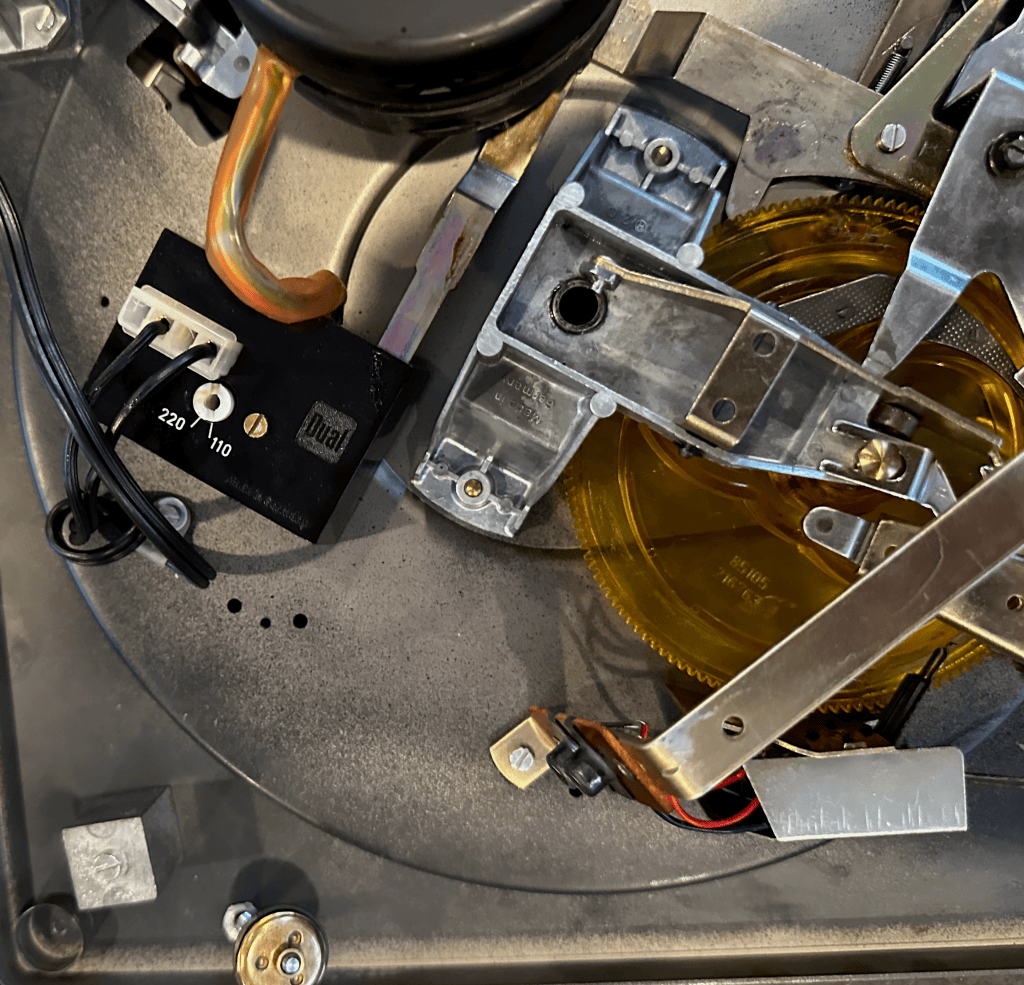
Reconstructing What Had Fallen Out During Shipping
One of the first challenges was simply figuring out what I was looking at.
Several pieces had shaken loose during shipping, and there was no convenient note attached to them explaining where they belonged. With a turntable as mechanically complicated as the 1219, finding a loose spring, bushing or metal component doesn’t necessarily make its purpose obvious.
One of the more important discoveries was a long metal component that turned out to be part of the record-changing mechanism, the Wechselbolzen (Dual part #216 756) along with its associated spring and bushing.

That was important because this wasn’t some random piece of hardware from the bottom of the cabinet. It was part of the mechanism that allows the 1219 to perform the functions that made me want one in the first place.
Piece by piece, I started identifying what had come loose and reconstructing the mechanism.
Eventually I reached the point where everything appeared to be back where it belonged.
Then I moved the START lever.
And discovered the next problem.
Fixing the Automatic Start and Return
The good news was that the automatic mechanism was doing something.
The bad news was that it didn’t know when to stop.
The 1219 had essentially become trapped in its automatic cycle. The main cam underneath the turntable continued rotating, causing the mechanism to repeat instead of completing the sequence and disengaging normally. Initially, that was intimidating. Looking underneath a Dual 1219 for the first time is not exactly reassuring if you’re trying to diagnose a problem. There are levers, springs, linkages and moving components everywhere, and several things have to happen in the correct sequence for the automatic system to work properly.
But this was also exactly why I had wanted a mechanically interesting turntable.
I began working through the mechanism, figuring out which components controlled the start sequence, how the tonearm was moved, what triggered the return cycle and, importantly, what told the mechanism that the cycle was finished. The loose changer components turned out to be an important part of the puzzle. Once the Wechselbolzen, spring and bushing were returned to their proper positions and the rest of the mechanism was checked and reset, things started behaving very differently.
START.
The platter began turning.
The tonearm lifted.
It moved across the record.
It lowered.
And this time, it stayed there.
At the end of the record, the process reversed. The tonearm lifted, returned to its rest, lowered into position and the turntable shut itself off. After everything this 1219 had been through, watching that sequence work correctly was incredibly satisfying.
The automatic turntable I had spent 18 months looking for was finally behaving like an automatic turntable.
Fixing the Tonearm Contact Plate
Getting the mechanics working exposed another problem: getting reliable audio out of it.
The Dual 1219 uses a removable cartridge carrier that connects to a small contact plate inside the end of the tonearm. During shipping, that contact plate had been knocked out of its proper position.
It was another small component that created a disproportionately large problem.

Once I figured out where the plate belonged, I was able to reseat it correctly beneath its retaining tab and restore proper contact between the cartridge carrier and tonearm wiring.
The result was immediate. Clean audio.
No mystery channel problems. No intermittent connection. Just the cartridge working the way it was supposed to.
Considering that the cartridge carrier itself had been hanging loose when I first opened the box, I considered that another significant win.
Wait – Where Is the Ground Wire?
Then came something that sent me looking for a problem that didn’t actually exist.
Where was the ground wire?
Almost every turntable I had dealt with conditioned me to expect the familiar arrangement: left and right RCA connections accompanied by a separate ground lead that gets attached to the amplifier or phono preamp.
I kept looking at the Dual wondering what I was missing. As it turns out, I wasn’t missing anything.
The original Dual 1219 wiring arrangement doesn’t necessarily use the separate external ground wire I had become accustomed to seeing on other turntables. The grounding scheme can be handled through the signal wiring, depending on how the table is wired and whether it has been modified over the years.
That was another reminder that working on a turntable designed more than 50 years ago sometimes means forgetting what you expect a modern turntable to look like and figuring out how this machine was designed to work.
And once connected properly, mine was quiet. No missing wire. No grounding problem. Just another lesson learned.
Repairing the Manual Tonearm Lift
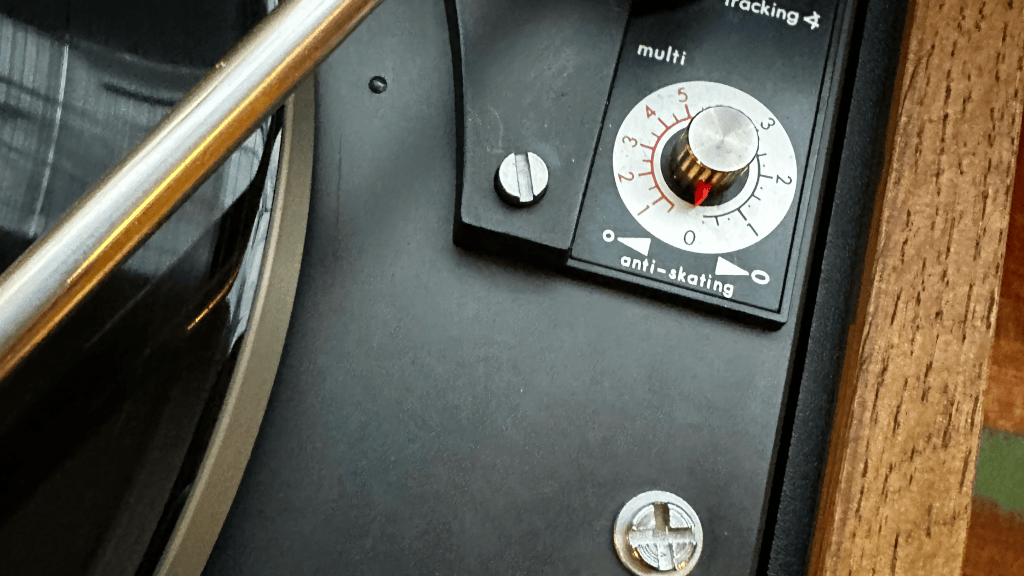
With automatic start and return working, one mechanical problem remained that I wasn’t willing to ignore: the manual cueing mechanism.
The 1219 could now handle the automatic process, but I also wanted to be able to operate it normally by hand. That meant the cueing lever needed to reliably raise and lower the tonearm. Initially, I assumed something inside the lift mechanism would need to be repaired or replaced. The solution turned out to be much simpler.
Just to the left of the anti-skating control is a small slotted adjustment screw that controls the height of the 1219’s manual tonearm lift. Mine was adjusted too low, leaving the cueing mechanism without enough travel to properly raise the stylus clear of the record.
After carefully adjusting the screw, the tonearm once again lifted to the proper height when I moved the cueing lever and lowered smoothly back onto the record when released. No replacement part was needed, just an adjustment I hadn’t initially realized was available from the top of the turntable.
Now I could use the 1219 either way.
Move the tonearm manually and use the cueing lever, or move the START control and let the Dual take care of everything itself.
That’s exactly what I had wanted when this search began.
What About the Dual 1219 Record Changer?
There is still one part of the 1219 story I haven’t finished: multi-play operation.
One of the features that makes the 1219 especially interesting is its ability to operate as a record changer using the appropriate stacking spindle. Multiple records can be loaded, with the mechanism dropping the next record and continuing playback automatically.
I haven’t fully tested that system yet, and I’m not going to call it functional simply because the rest of the automatic mechanism now works. I already know the single/multi-play selector is stuck in the single position, and everything I’ve found suggests that forcing it into multi-play is a very bad idea. Doing so can damage the mechanism and turn a relatively minor issue into a much more expensive repair.
That’s a project for another day.
Getting the proper multi-play setup together and testing the changer mechanism will be another part of learning what this turntable can do. For now, I’m treating that as a future phase of the restoration rather than something I needed to accomplish before putting the 1219 back into service.
Mechanically, My Dual 1219 Was Back
At this point, the transformation was a little strange to look at.
There was no finished wooden plinth surrounding it and no new dust cover sitting over it. Cosmetically, I was nowhere near finished. But sitting there on my work surface was something far more important: a functioning Dual 1219.
The parts shaken loose during shipping were back where they belonged. The automatic start, return and shutoff were working again, the tonearm was delivering clean audio, and manual cueing had been restored. The multi-play changer would have to wait for another day.
For the first time since opening that battered shipping box, I wasn’t looking at a damaged turntable anymore.
The mechanical restoration had brought it back.
Now I could start making it mine.

Upgrading and Refining My Dual 1219
Vintage Marketplace
Looking for a Dual 1219?
The Dual 1219 remains one of the most distinctive turntables of the early 1970s, combining idler-drive performance with a remarkably sophisticated automatic mechanism. Original, restored and project examples still appear regularly on the used market. Condition can vary considerably, so look closely at the automatic functions, tonearm operation, plinth, dust cover and how the turntable will be packed for shipping.
Shop Dual 1219 Turntables on eBayAffiliate link. Price and availability may change.
Getting the Dual 1219 mechanically functional again was the hard part.
Now came the fun part.
From the beginning, my goal wasn’t simply to repair whatever had been damaged during shipping and call it finished. I had spent too long looking for a 1219 to end up with something that merely worked. If I was going this far, I wanted the finished turntable to look every bit as good as it operated.
In some ways, the shipping damage actually made those decisions easier. The original plinth was too badly damaged to use without a substantial restoration, the dust cover was cracked, and the turntable was already sitting stripped down on my work surface.
I had a blank canvas.
A New Walnut Plinth Changes Everything
The biggest visual transformation came from replacing the destroyed original plinth.
I chose a newly made solid walnut plinth specifically designed for the Dual 1219, and it completely changed the character of the turntable.
This wasn’t simply a matter of replacing something that had broken. The original plinth had already seen better days before shipping finished it off, and I had been considering replacing it from the beginning. Now there was no reason to compromise.
Once the 1219 chassis dropped into the new walnut base, the entire project suddenly started making sense visually.
The brushed metal top plate, black controls and massive platter looked fantastic against the darker natural wood. The Dual still looked unmistakably like a piece of early-1970s equipment, but the new plinth gave it a much more substantial and refined appearance.
This was the first moment when the project stopped looking like a repair.
It started looking like my Dual 1219.
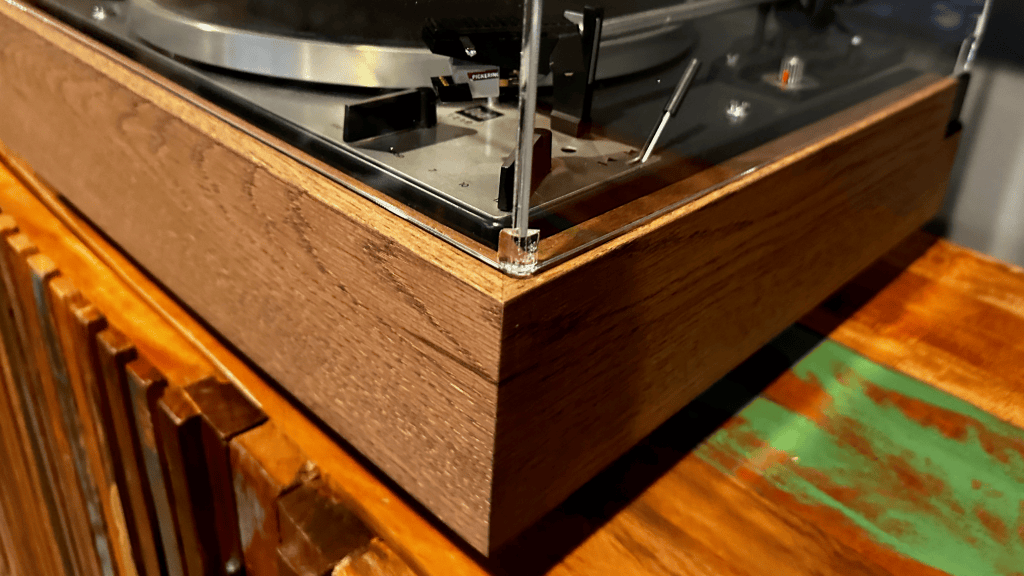
This is also one of the areas where owners restoring a 1219 have options. Original Dual plinths still appear on the used market, while several sellers offer newly made wood bases in different finishes and configurations. If you’re interested in the custom wood plinth I used for my Dual 1219, you can find it below.
View the Dual 1219 Wood Plinth on eBayReplacing the Damaged Dust Cover
The cracked dust cover was another obvious casualty of shipping.
Technically, I could have continued using it. It hadn’t shattered, and it would still sit over the turntable. But after installing the walnut plinth, putting a badly cracked 50-year-old cover back on top of it made very little sense.
So the old cover was retired and replaced with a new clear acrylic dust cover. This was another upgrade that made a much bigger visual difference than I expected.
A clean acrylic cover lets the walnut and metalwork remain the focus instead of immediately drawing your eye toward scratches, haze and cracks. More importantly, it finished the transformation. The 1219 finally looked like a complete turntable again rather than a restored mechanism waiting for its cabinet.
Replacement covers are readily available for many vintage Dual models, although dimensions and hinge arrangements can vary depending on the plinth being used. That’s something worth checking carefully before ordering.
View the Dual 1219 Acrylic Dust Cover on eBayBringing the Top Plate Back
Then there were those stickers.
Compared with a destroyed plinth or malfunctioning automatic mechanism, removing a few stickers sounds trivial. Visually, it wasn’t. The top plate is such a major part of the Dual 1219’s appearance that anything stuck to it immediately stands out. I wanted the finished turntable to look clean and period-correct, not like something that had accumulated decorations through several owners.
Removing the stickers and carefully cleaning the surrounding surfaces brought the original Dual design back into focus.
This was one area where restraint mattered. With vintage finishes, lettering and markings, aggressive cleaning can easily create a bigger problem than the one you’re trying to solve. The goal wasn’t to make a 50-plus-year-old turntable look artificially new. It was to remove the distractions and preserve what had survived.
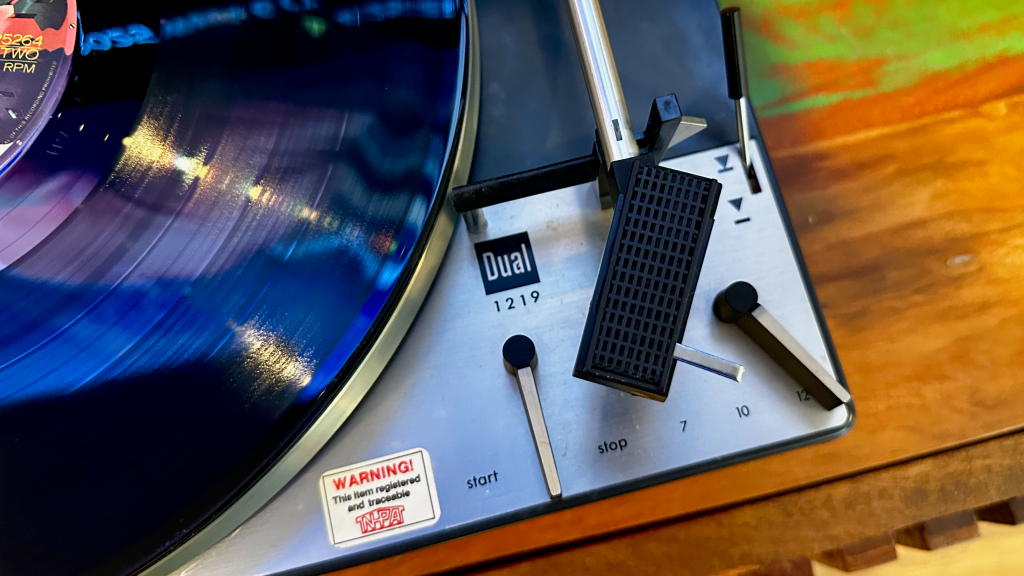
And underneath those stickers was still a remarkably good-looking 1219.
Replacing the Platter Mat
The platter mat was another piece I decided to address.
A turntable can be mechanically perfect and beautifully restored, but a tired mat sitting on top of that enormous platter is one of those details your eye notices immediately.
I replaced it with a more appropriate mat that better complemented the original appearance of the 1219.
It’s a relatively small change, but this project had reached the point where the small details mattered. The major mechanical problems were solved. Now I was looking at the turntable as a finished piece of vintage audio equipment.
For anyone restoring one of these, original and reproduction Dual platter mats regularly appear on the secondary market.
The Cartridge Was a Pleasant Surprise
One component I didn’t immediately need to upgrade was the cartridge.
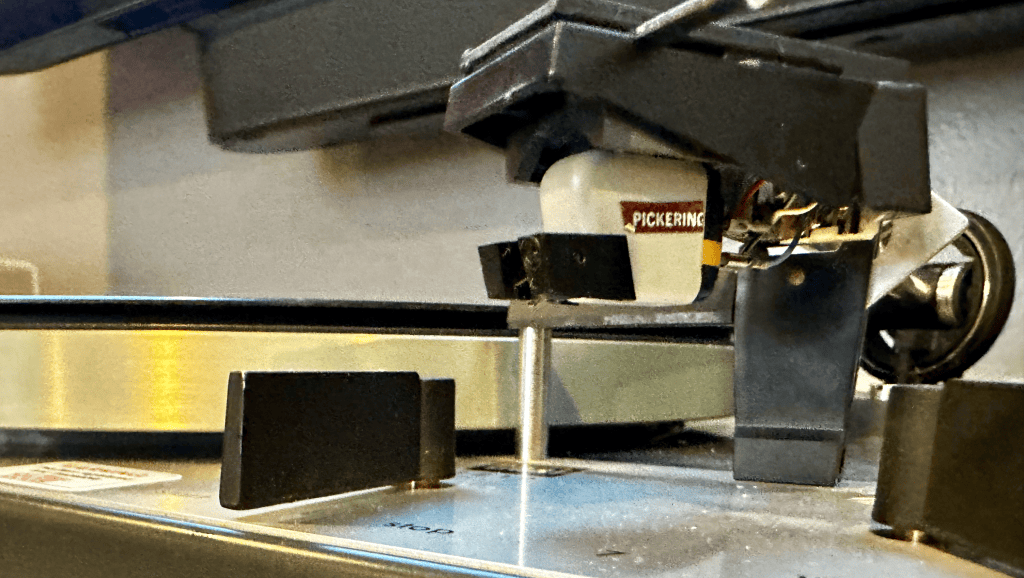
The 1219 arrived with a vintage Pickering cartridge, and considering everything that happened during shipping, seeing the cartridge carrier hanging loose when I opened the box had been particularly concerning.
Fortunately, the cartridge itself survived.
And the more I learned about what was installed, the less interested I became in replacing it simply for the sake of putting something newer on the turntable. There is something appealing about keeping a vintage Dual paired with a cartridge that looks and feels appropriate to the period. The Pickering gives the front of the tonearm a distinctly vintage appearance that a modern cartridge wouldn’t quite duplicate.
There is, however, one piece still missing.
These Pickering setups are immediately recognizable with their brush assembly mounted in front of the stylus, and mine no longer has its original brush. Replacements occasionally appear on the secondary market, so I’ve started looking for the correct original Pickering brush to complete the cartridge rather than replacing the cartridge itself.
That’s really what this stage of the project has become. The 1219 works. Now I’m hunting down the smaller period-correct details that make it feel complete.
Assuming the cartridge body remains healthy, replacement styli and other Pickering components are still available through the secondary market and eventually, I hope that includes the right original brush for mine.
The Details Started Adding Up
None of these changes fundamentally altered what the Dual 1219 was.
That was intentional.
I wasn’t trying to modernize it. I wanted to preserve the things that gave the 1219 its character while improving what time and one particularly rough trip through the shipping system had taken away.
The walnut plinth, clear acrylic cover, cleaned top plate, new mat and vintage Pickering cartridge all came together without disguising what was underneath.
It still looked unmistakably like a Dual 1219.
Just a particularly nice one.
From Shipping Damage to Something I Wanted to Display

For the first time, I could step back and see the turntable I had pictured when this whole journey started.
The restoration hadn’t erased its age or transformed it into something it wasn’t. It had simply given the original design a better frame.
After 18 months of searching and considerably more time putting this particular example back together, I finally had my Dual 1219.
Living With the Dual 1219
After everything it took to get here, actually using the Dual 1219 feels almost anticlimactic.
And I mean that in the best possible way.
The main restoration was finished. For the moment, the tools could finally go away. Now I can put on a record, move the START lever and listen.
That was the whole point.
How It Sounds
The first thing that struck me about the 1219 wasn’t some dramatic sonic characteristic I could immediately attribute to the turntable. That’s always a difficult claim to make anyway. The cartridge, stylus, phono stage, speakers and condition of the record itself all have a much more obvious influence on what ultimately reaches your ears.
What I can say is that this Dual sounds very, very good.
The Pickering cartridge has turned out to be a particularly nice match. There’s a warmth and fullness to the presentation that feels completely at home with the 1219, without sacrificing the detail that makes a good vinyl setup enjoyable.
More importantly, nothing about the mechanical complexity of the 1219 gets in the way of listening.
That may sound like an odd thing to point out, but remember what is happening underneath this turntable. This is an idler-drive machine with an elaborate automatic mechanism, multiple linkages and a system designed not only to move the tonearm automatically but also to accommodate record-changing operation.
Yet once the stylus reaches the groove, all of that complexity disappears.
You’re just listening to a record.
There’s also something satisfying about playing music from the same era as the turntable itself. Put a good 1970s pressing on the platter and the entire experience comes together, the large platter spinning, the Pickering cartridge at work and that walnut plinth underneath everything.
It feels less like recreating the past and more like experiencing the equipment the way it was intended to be experienced.
And after rebuilding so much of this particular 1219, there is an additional satisfaction every time a record plays cleanly from beginning to end.
I know what is happening underneath that platter now.
I also know what it took to get it there.
Using a Fully Automatic 1970s Turntable
This, however, is where the Dual 1219 has really changed my listening experience.
For years, my turntables have required some version of the same ritual. Put the record on. Start the platter. Move the tonearm into position. Lower it onto the record. Then, when the side finishes, get up and deal with the tonearm.
There’s nothing wrong with that. In fact, the hands-on nature of playing records is part of what I enjoy about vinyl.
But automatic operation is wonderfully convenient.
Place a record on the platter, move the lever to START and the 1219 takes over. The platter begins turning. The tonearm rises from its rest, moves across the record and gently lowers the stylus into the lead-in groove.
Then I do absolutely nothing.
When the side ends, the tonearm lifts, travels back across the record, settles onto its rest and the turntable shuts itself off. Maybe that doesn’t sound particularly remarkable in an era when almost everything in our homes can be automated.
But watching a completely mechanical turntable built more than 50 years ago perform that sequence is different.
There isn’t an app controlling it. There isn’t a processor deciding where the tonearm should go. There isn’t software orchestrating the sequence.
It’s mechanics.
Levers, springs, cams and carefully timed movements are doing all of it.
And after spending time underneath the 1219 figuring out how those pieces interact, I probably appreciate the automatic sequence more than I would have if the turntable had simply arrived working perfectly. I still use the 1219 manually sometimes. That’s another thing I like about it. If I want the familiar ritual, I can move the tonearm myself and use the cueing lever just as I would on one of my other turntables.
But when I want automatic operation, it’s there.
That combination is exactly what I was looking for when this journey started.
The Record Changer Is Still Waiting
There is still one experience I haven’t tackled.
With the proper multi-play spindle, the 1219 can operate as a record changer, automatically dropping the next record and continuing playback. I haven’t fully tested that system yet, and I’m not going to call something functional simply because the rest of the automatic mechanism works.
That’s a project for another day.
For now, I’m perfectly happy using the 1219 as a single-play automatic turntable.
I wanted an automatic turntable because I had never owned one.
What I didn’t expect was how much I would enjoy watching it work.
Dual 1219 vs. My Yamaha YP-800 and Pioneer PL-12D
One of the interesting things about adding the Dual 1219 to my collection is how different it is from my other vintage turntables.
My Yamaha YP-800 and Pioneer PL-12D come from roughly the same era, but putting all three next to each other demonstrates just how many different ideas manufacturers had about what a turntable should be.
There’s another interesting distinction between them: I now have all three major turntable drive systems represented in my collection.
The Dual 1219 is idler drive. The Yamaha YP-800 is direct drive. And the Pioneer PL-12D is belt drive.
I’ve spent enough time with all three that this isn’t a comparison based on specifications alone. I’ve bought them, set them up, worked on them and actually listened to records on them.
And I don’t think the Dual 1219 replaces either of the others.
It gives me something completely different.
| Dual 1219 | Yamaha YP-800 | Pioneer PL-12D | |
|---|---|---|---|
| Drive system | Idler drive | Direct drive | Belt drive |
| Funcionamiento | Fully automatic or manual | Manual | Manual |
| Record changer | Yes, with multi-play spindle | No | No |
| Speed | 33⅓, 45 & 78 RPM | 33⅓ & 45 RPM | 33⅓ & 45 RPM |
| Design philosophy | Mechanically sophisticated | Refined and substantial | Simple and straightforward |
| Ownership appeal | Mechanics and automatic operation | Build quality and presentation | Simplicity and accessibility |
| My experience | Restoration and mechanical learning | More traditional manual listening | Hands-on restoration and upgrades |
Three Very Different Ways to Play a Record
Owning the Dual 1219 alongside my Yamaha YP-800 and Pioneer PL-12D has given me something I didn’t intentionally set out to build: examples of three very different approaches to vintage turntable design.
The Pioneer PL-12D is the simplest of the three. It’s a straightforward belt-drive turntable without an elaborate automatic mechanism. Put on a record, start the platter, position the tonearm and lower the stylus.
That simplicity is part of its charm, and it’s one reason I’ve enjoyed working on mine and making improvements over time.
The Yamaha YP-800 approaches the manual turntable differently. Its direct-drive system eliminates the belt or idler wheel entirely, and the table has a more substantial, refined presence. Its materials, proportions and presentation are a major part of what I enjoy about owning it.
Then there is the Dual 1219.
The Pioneer and Yamaha ask me to operate them. The Dual invites me to watch it operate.
Move the START lever and the platter begins turning. The tonearm rises, moves toward the record and lowers the stylus. When the side finishes, the process reverses and the turntable shuts itself off.
That’s what separates the Dual from the other two for me.
There is an entire mechanical world operating underneath the platter, and after spending so much time underneath mine repairing that system, watching it work has become part of the enjoyment of using it. If I had owned only one of these turntables, I don’t think I would appreciate their differences nearly as much.
The Pioneer PL-12D gives me simplicity. The Yamaha YP-800 gives me refinement.
The Dual 1219 gives me mechanical personality.
None is inherently better than the others. They’re simply three very different engineering approaches to accomplishing the same basic job.
That’s also why I don’t see the Dual replacing either of my other turntables.
It didn’t fill the same space in my collection.
It created a new one.
What Did My Dual 1219 Restoration Cost?
At some point in almost every vintage audio restoration, you have to ask the uncomfortable question:
How much money do I actually have in this thing?
With my Dual 1219, that question is especially interesting because the economics changed almost immediately after it arrived.
I originally paid $375 plus shipping for the turntable. After seeing the shipping damage and acknowledging that it had been improperly packed, the seller refunded me $175.
That effectively reduced the purchase price of the Dual itself to $200.
Of course, that wasn’t the end of the spending.
My Dual 1219 Cost Breakdown
| Item | Cost |
|---|---|
| Original Dual 1219 purchase price | $375 |
| Seller refund for shipping damage | -$175 |
| Effective cost of the turntable | $200 |
| Solid walnut replacement plinth | $265 |
| New acrylic dust cover | $160 |
| Steuerpimpel | $9 |
| Lubricants and grease | $15 |
| Mineral oil for cleaning/restoration | $9 |
| Replacement RCA cables | $20 |
| Replacement platter mat | $20 |
| Total investment | $698 |
Putting the $698 in Perspective
So, at least in actual dollars spent, I have $698 invested in my Dual 1219.
Most of that wasn’t spent repairing the turntable. The $265 walnut plinth and $160 acrylic dust cover account for $425 of the total. The shipping damage made replacing both easier to justify, but these were also upgrades I wanted for the finished turntable.
Another $73 went toward the less glamorous parts of vintage restoration – lubricants, cleaning supplies, the steuerpimpel, RCA cables, platter mat and other small items that don’t seem particularly expensive until you add them together.
And there is one important thing missing from that $698 figure: labor.
I did the work myself. Had I paid a vintage-audio technician to diagnose the automatic mechanism, reconstruct the pieces shaken loose during shipping, repair the tonearm contacts, service the mechanism and sort out the cueing system, the economics would look very different.
But learning the machine was part of the reason I wanted the project in the first place. I’m treating that time as part of the experience rather than assigning it an hourly rate.
Could I have simply purchased a properly restored Dual 1219?
Absolutely. Depending on how someone values their time, that may even be the more sensible route.
Nor do I assume that spending $425 on a walnut plinth and acrylic cover added $425 to the turntable’s resale value. Vintage audio doesn’t work that way.
The $698 isn’t an investment calculation.
It’s simply what it cost me to build the Dual 1219 I wanted.
Was the Dual 1219 Worth the Journey?
Definitely.
The Dual 1219 I started looking for 18 months ago was supposed to be much easier than this.
I wanted a nice example that I could buy, bring home and enjoy. Had that first local Dual worked out, that’s probably exactly what would have happened.
Instead, I got a broken plinth, cracked dust cover, loose parts and a turntable that had been shaken hard enough during shipping to disable mechanisms that had survived for more than 50 years.
And strangely enough, I’m glad it worked out that way.
I ended up underneath the chassis learning how the automatic mechanism worked. I tracked down pieces that had shaken loose, repaired the tonearm contacts, worked through the cueing system and slowly watched functions return one at a time.
Then I got to decide what the finished turntable would become.
The walnut plinth, clear acrylic cover and other changes weren’t an attempt to make the 1219 something it wasn’t. They were my opportunity to take a machine that had survived more than half a century and give it another chapter.
That’s why this particular Dual means more to me than one I could have simply purchased already restored.
I know this one.
For now, it has a place in my home, and I suspect it will be a pretty good conversation piece. Even someone who knows nothing about vintage turntables can appreciate watching the platter start, the tonearm rise and move across the record, and the stylus gently lower into the groove.
That’s part of what draws me to vintage audio in the first place. These machines don’t interest me simply because they can still play music. I’m interested in the engineering, design and history behind them.
They’re time capsules.
Someday, this one may have another destination.
One of my goals after retirement is to eventually open a store in Rehoboth Beach, Delaware, where vintage audio, records and the interests behind Needle & Vine can come together in a physical space. If that happens, I can picture this 1219 there maybe on display, maybe playing records in the shop.
And eventually, maybe somebody walks through the door, recognizes what it is and takes it home.
I’d actually be okay with that.
Someone built this Dual more than 50 years ago. Other people owned it before me. Someone put those stickers on it. Someone eventually listed it on eBay. A shipping company nearly finished it off.
Then it came to me.
My part of its story was putting it back together.
Eventually, someone else may become its caretaker. Until then, I’ll enjoy the fact that a turntable that arrived at my house partially broken is once again doing exactly what Dual designed it to do more than half a century ago.
The funny thing is that after searching for a Dual 1219 for 18 months, I never actually found the one I was looking for.
I ended up building it.
Índice
- Why I Wanted a Dual 1219
- The Search for the Right Dual 1219
- First Look: What Did I Actually Buy?
- Restoring the Dual 1219’s Missing Functions
- Upgrading and Refining My Dual 1219
- Living With the Dual 1219
- Dual 1219 vs. My Yamaha YP-800 and Pioneer PL-12D
- What Did My Dual 1219 Restoration Cost?
- Was the Dual 1219 Worth the Journey?